


Starlink Router Mini – Setup Guide
KSh 15,000.00
Router Mini – Setup Guide

Specifications:
- IEEE 802.11a/b/g/n/ac/ax
- Dual-band 2.4GHz and 5GHz
- 2×2 2.4 GHz, 2×3 5 GHz MU-MIMO
- WPA2 security
- Operating Temperature: -22°F to +122°F (-30°C to +50°C)
Compatibility:
- Compatible with all Starlink routers except Gen 1 (works with Starlink Mini, Gen 3 Router, Gen 2 Router)
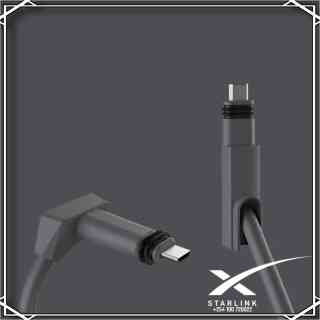
- For connection to your Starlink Mini and to maintain the waterproof IP rating to your dish, use the Mini Starlink Ethernet Cable available on shop.starlink.com.
What is Starlink Mesh?
To purchase Starlink Mesh for your home network, log into your account and visit the Starlink shop.
In some homes, a single WiFi router may not provide enough wireless coverage, leading to poor performance in certain areas. A Starlink Mesh network extends coverage by placing Starlink Mesh routers between your main router and areas with weak signals. For the best performance, place Starlink Mesh routers 1–2 rooms apart from the primary router.
We do not recommend using more than three Starlink Mesh routers. For larger homes, wiring Starlink routers can significantly enhance WiFi coverage and performance. Wired connections eliminate wireless interference from walls or furniture, providing a stable and fast connection. You can run ethernet cables from the main router to connect additional routers or mesh nodes directly. This setup is especially beneficial in homes over 6,000 square feet, where wireless mesh alone might not suffice.
Important Notes:
- Starlink mesh routers can be purchased to replace a damaged router of the same type.
- Gen 1 Router does not support mesh.
Starlink Router Mini – Setup Guide

Helpful Tools:
- Starlink Router Mini – Install Guide (PDF)
- What is Starlink Mesh?
- How does Starlink Router Mini compare to Gen 3 Router?
- Where is the Starlink Router Mini available for purchase?
Compatibility:
- Compatible with all Starlink routers except Gen 1 (works with Starlink Mini, Gen 3 Router, Gen 2 Router)
- For connection to your Starlink Mini and to maintain the waterproof IP rating to your dish, use the Mini Starlink Ethernet Cable available on shop.starlink.com.
1. Set Up Your Starlink
Start by making sure your Starlink is set up and connected to the internet prior to setting up your router.
Connect to your existing Starlink WiFi network from your device.

2. Position the Routers
Place the router in the desired location. We recommend the following guidelines for setting up your mesh network:
- For best performance use a wired connection to your main Starlink router or Starlink Mini.
- Place routers no more than two rooms away from each other.
- Avoid multiple obstructions (ex: cement walls and metal appliances)
- Place the router off the ground, such as on a shelf.
Repeat with additional mesh nodes.

3. Select Install Method Choose your preferred installation method, either on a table or wall and install the stand.
More information on stand installation later in document.

4. Connect to Network
Insert the power cable to the back of the router and plug the power supply into a power outlet. An LED will turn on signifying the unit is powered on.
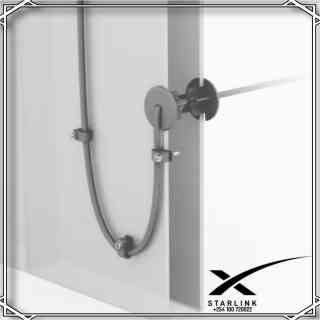
The Starlink Router Mini can be meshed to your current Starlink system (excluding the Gen 1 Router) either wired or wirelessly. For a wired connection to a Starlink Mini Kit, use 15m Mini Starlink Ethernet Cable. If connecting to another Starlink router, use a RJ45 Cat5e or greater. For a wireless connection, power on your router and follow prompts in the app.
More information on wire and wireless meshing later in document.

WIRED MESH GUIDE

- Set up your Starlink Kit as shown in the install instructions and ensure you are online.
- Place your Starlink Router Mini in the desired location and connect the power supply.
- Plug in an ethernet cable into the LAN port of the back of your existing Starlink router or Starlink Mini. For Gen 3 you will need to remove the protective cover to access the ports.
- Run the ethernet cable from the main router to your Starlink Router Mini. Connect to the WAN port of your router (Starlink symbol) to create a wired mesh network.
- Repeat with additional mesh nodes.
WIRELESS MESH GUIDE

- Ensure your Starlink Kit is set up and connected to the internet prior to adding your mesh nodes.
- Find suitable install locations for your mesh nodes and plug them into power outlets.
- Open the Starlink App.
- Wait 1-2 minutes for a “New Mesh Node(s)” notification to appear in the app.
- Tap “Pair” or “Pair All”. The node(s) will begin connecting on the “Network” screen. Connection will take about 1-5 minutes.
- Repeat with additional mesh nodes
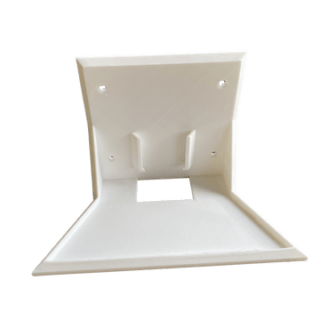
ROUTER STAND INSTALLATION
1. Mark and Drill Mounting Holes Use the mount as a guide to mark the hole locations then drill using a 5.5mm (7/32 in) drill bit.

2. Screw Mount to Surface Install the drywall anchors into the holes then secure the Mount using the provided screws.

3. Install Router into Mount Snap in the router to the wall mounted stand carefully, ensuring the product sits flush once fully installed.


| Brand |
|---|
Related products
-
Starlink Ethernet Adapter Mount + Starlink Router Wall Mount 2 in 1 Combo | White Bracket Only
KSh 10,000.00Add to cartProduct features:
– Durable hard plastic material- Combo pack, Router + Ethernet Adapter 2 in 1- Great for organizing Starlink setup- Comes in black and white- Easy to installCompatible with Gen 2 Starlink Ethernet Adapter and Mount*As with most 3D printed parts/pieces, there WILL be bumps, humps, dips, lines, edges, fuzzy areas, miscolored spots, streaks, etc that in no way affect the usability, strength, or performance of this product.**Plastic is NOT designed for outdoor use or to be used in extreme temperatures as warping and/or sagging could occur. Leaving out in the summer heat not recommended. Use indoors in moderate temperatures.**Screws or other components used to mount the unit are not included.***This listing DOES NOT include Starlink equipment***Package Dimensions:
Lenght: 4 in / 11.43 cm, Width: 4.5 in / 10.16 cm, Height: 8 in / 20.32 cm
Package Weight:
5 oz / 0.33 lb
-

STARLINK GROUND POLE MOUNT KENYA
KSh 22,000.00Add to cart*Price includes shipping and handling fees
Designed for in-ground installation when roof or wall mounting is not possible. Requires digging.Compatibility: Rectangular Starlink
Tools Needed: Shovel, Mortar Hoe, Mixing Trough / Bucket, Gloves, Concrete Mix, and WaterMount Dimensions: Height: 88.9″ / 225.8 cm, Outer Diameter: 1.88″ / 4.8 cm, Inner Diameter: 1.75″ / 4.45 cmPackage Dimensions: 45.7” x 4.5” x 2.4” / 116 x 11.5 x 6.1 cmPackage Weight: 9.43 lbs / 4.27 kgDM•Text•Call 24/7 Support
+254100720022 / +254720548999
-

STARLINK 150 FT REPLACEMENT CABLE KENYA
KSh 35,000.00Add to cart*Price includes shipping and handling fees
The 150’ cable is designed to replace the standard 50’ cable from the Starlink Kit when additional length is needed between your install location and the router.Tools Needed: N/APackage Dimensions: 12.2” x 3.5” x 12.8” / 31.1 x 8.9 x 32.3 cmPackage Weight: 6 lbs / 2.75 kgDM•Text•Call 24/7 Support
+254100720022 / +254720548999
-
STARLINK CABLE ROUTING KIT KENYA
KSh 18,000.00Add to cart*Price includes shipping and handling fees
Designed for drilling through most walls. Not recommended for masonry, concrete, or hard coat stucco. Best for customers with prior internet cable routing experience and installation; must be comfortable drilling through walls. Kit includes a 3/4″ (1.9 cm) spade bit, drill bit, cable routing tool, silicone sealant, grommets, and wall clips.Tools Needed: Drill, Stud / Electrical FinderPackage Dimensions: 3.75″ x 5.25″ x 1.75″ / 34.9 x 13.3 x 4.4 cmPackage Weight: 0.83 lbs / 0.38 kgDM•Text•Call 24/7 Support
+254100720022 / +254720548999
-
STARLINK 75 FT REPLACEMENT CABLE KENYA
KSh 30,000.00Add to cart*Price includes shipping and handling fees
The 75’ cable is designed to replace the standard 75’ cable from the Starlink Kit in case of damage.Tools Needed: N/APackage Dimensions: 5.8″ x 2″ x 17.1″ / 14.9 x 5.1 x 43.6 cmPackage Weight: 3 lbs / 1.4 kgDM•Text•Call 24/7 Support
+254100720022 / +254720548999
Reviews
There are no reviews yet.